Aug 18, 2012

Enjoying the Moment


To add a little atmosphere and gaiety we hung garlands of LED Christmas lights from the pergola. The LED garlands are solar powered so wiring was a cinch.  It also made a nice spot from which to view our campfire though it was a ways off. We were fortunate after a long dry spell and fire ban to have the ban lifted so that we could enjoy our campfire this evening.

Aug 15, 2012

Working into the Dark

 Darkness was starting to come earlier but we were determined to finish the job this evening which we accomplished by 9:30 pm that night.

What's interesting is that with the LED Headlights on our heads we were able to keep working uninhibited by the dark. We never needed any other lighting either which we had at the ready.
Some of the lag screws and washers used.

The long galvanized screws became quite a burden to screw in because of the friction with the wood. We screwed them in using a ratchet and socket. By rubbing regular bar soap into the screw threads and on the shaft made the work much easier.

Aug 14, 2012

Installing the Purlin Beams

 The two purlin beams were installed. The tops of the posts were sloped to align with the curvature of the beams.
 The beams were fastened with two 12" galvanized lag screws and washers into each post.
The bent braces were then screwed into the beams and posts. The ends of the braces were mitred to sit flush with the post or beam surfaces.

Aug 13, 2012

Installing the Four Posts


Once the four posts were prepared they were cut square at the top and bottom to ensure that they would stand straight. For each post a base was created by digging an 18"x18" hole 4 in. deep, then filled it with stone dust and covered with an 18'x18' patio stone which was then carefully leveled. The posts were then stood up on the patio stone bases.

The spacing of the pergola posts was 12' wide by 15' long. Once the posts were placed they were stablized by temporary braces fastened to pegs. This would allow us to put up the beams without having to worry  about knocking over the posts.

Aug 8, 2012

Preparation of the logs


Bent pieces were selected for the braces.

Improvised Crosscut saw using ladder and chainsaw to the left.

Electric hand-plane made quick work of the knots.  


The logs were planed and sanded.

Jul 28, 2012

Hauling in the Logs from the Woodlot

After the logs were peels they were left to dry off the ground by leaning on trees etc. for about a month. They were quite a bit lighter afterwards. The heaviest being  the furthest purlin beam still weighed 66 kg. (~145 lbs.)

May 20, 2012

Selecting and Peeling Logs

 The next step is to select, fell, cut and peel the logs for the pergola. During the months of May and June, the layer under the bark called the vascular cambium grows rapidly and is very tender. During this time the bark peels off the wood very easily and it is simply a matter of pulling off the bark in full length strips.

There are many overcrowded cedar groves in our woodlot that need thinning. This provided an ample supply of cedar logs to choose from for this project.

The eastern white cedar [Thuja occidentalis] is a tree species of choice for this build. While it is not a strong wood, it is very resistant to rot and insects and it weathers well. It is also called northern white-cedar, arborvitae and swamp-cedar. Arborvitae means "tree of life" a reference back to the 16th century when the French explorer Jacques Cartier learned from the Indians how to use the tree's foliage to treat scurvy.
Ref  http://www.borealforest.org/trees/tree14.htm

I attempted to peel the bark early -- at the end of April and also later -- in mid July and the peeling was very hard in both circumstances, pulling off only little strips of bark each time.

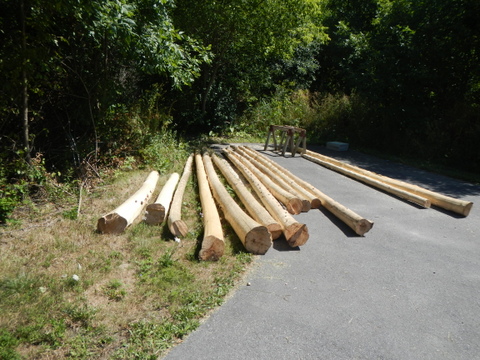
In all, 22 logs had to be selected and prepared in this manner and this was accomplished on schedule, before we went on a trip to the Maritimes. This also gave the logs time to dry somewhat which made them much lighter to carry.

May 12, 2012

Beginning the Pergola - Planning with a Scale Model

These photos are of a scale model 1:10 in metric or about 1:12 imperial (1 inch equals one foot.), of the pergola made from buckthorn weed tree sticks.

This was a useful exercise for getting an idea of the relative proportions of the pergola, namely of the height, depth and width as well as the desired diameters of the logs. It is also an excellent communication tool share ideas with others.


The perspective view here gives a better feel for its true appearance from the eye level at scale. (This fooled some of our FB friends into believing that this was a finished  final product. lol.)

Using a couple of Playmobil figures and plastic animals we had a little bit of fun with that. The figures were not even close to scale of the model though.

May 11, 2012

May 7, 2012

Walkway to the Patio

The walkway from the house to the patio was built the same way, with a much narrower box, a layer of landscape cloth, screeded, tamped and leveled stone dust, a layer of cloth and then the patio stones. This time however I selected 2ft x 2ft patio stones to make a wider walkway. These stones were awkwardly heavy weighing over 80 pounds each. Thankfully there were only five to place.
The soil here is very fertile making for excellent topsoil but being of glacial till it is full of rocks of all sizes which is awkward to rake and smooth, so I created a sieve fashioned from wood and ½ inch hardware cloth that can be seen here installed on the ATV trailer. I reused the quality soil to do the finish landscaping.

May 5, 2012

Levelling the Stone Dust and Laying the Patio Stones

Using two pieces of 1x4 strapping I made a screed board, screwing one to the other so that from the end it looks like a 'T'. This makes for a fairly rigid while light enough board to manipulate.  I then turned it upside down and slide it along the upper and lower box boards.

It was a tedious process of screeding and then tamping and then adding some more stone dust and repeating the screeding and tamping etc. but it was worth it.Once it was complete the rest was easier because of the attention to detail at this stage.

I decided that as soon as a row of about 3½ feet was done, to roll down a row of landscape cloth which is 3 feet wide, and the first row of patio stones very carefully aligned with the starting edge of the box. I managed to get the patio stones to pack very closely together by placing a stone on its edge on an adjacent stone that is already laid. I would then slowly lower the stone ensuring that as the stone tilted away that it would slide down very tightly to the first stone. Worked like a charm.

The purpose of the landscape cloth is to inhibit weeds from growing between the tiles.

May 2, 2012

Laying down the Stone Dust

The load of stone dust has arrived. It was placed onto a tarp to keep it from mixing with the grass, and facilitate the clean up.


The next step after leveling the earth, was to lay down a layer of landscape cloth and then place the stone dust on it. The cloth will keep the subsoil earth from mixing with the stone dust which will happen over time.

Apr 28, 2012

Box Frame Installed

Once the area was excavated, I built a box to act as a guide and reference for depth of the soil and later to screed, level and contain the stone dust. I selected the straightest pieces of SPF strapping which are 16' long 1" x 4". In each corner I hammered down a peg and carefully leveled the strapping before screwing them to the pegs using basic 1¼ in. floor screws. I then cut off the tops of the pegs level with the boards. I chose to cover the patio with 18"x18" patio stones since they are manageable enough to manipulate at about 19 kg or 42 pounds each. Also these larger stones would be much faster to place and easier to level than interlocking brick.

To use whole patio stones I chose the patio dimensions of 12 feet by 13½ feet as multiples of the 18" stones.  For drainage, I provided a slight slope following the contour of the land and the edge away from the house is 5 cm or 2 inches lower than the upper side near the house.

I decided to leave the box frame permanently in place afterwards and covered it during landscaping since the patio stones sit above it. SPF lumber will rot over time and disappear I figure.

Apr 8, 2012

A Rocky Surprize

 In the digging process, we never know what we may run into. The soil here is mainly glacial till subsoil with a topsoil overburden and all of it is rocky from pea sized stones to huge bolders. Since the soil is permeable it is susceptible to frost heaving or pushing up of any rocks by the spring frost. Hence if we ever detected even the tip of a rock we would remove it, but the size would be unknown and a surprize. In this photo a good sized and well lodged rock surfaced and took some major effort to remove. Pry-bars were basically ineffective.
Finally we dug around the rock and wrapped a chain around it and with the ATV were able to pull it out.

Clay and sand are not permeable soils thus they are not susceptible to frost heaving, and are preferred soils to use under structures. The holes created by the rocks here were back filled with sand and tamped down.

Apr 7, 2012

Next Project -- Patio and Pergola

Our project for 2012 was to build a patio and a pergola where we could enjoy the scenery, the air, and the sun. In the early planning stage, we took a tarp and laid it down on the ground and moved it around until we felt we had the right place for it.

I then put down stakes and lines to roughly determine the area where to dig. I need to dig down 10 cm (4 inches) to put down a base of stone dust also called limestone screenings.
These stakes and lines helped me locate the digging area without interfering with the digging itself.